> ## Documentation Index
> Fetch the complete documentation index at: https://docs.anchorage.com/llms.txt
> Use this file to discover all available pages before exploring further.

# Trusted destinations

> Add, manage, and remove trusted withdrawal destinations from the web dashboard.

export const ImageCarousel = ({images, perView = 3, children}) => {
  const [page, setPage] = useState(0);
  const [imgH, setImgH] = useState(0);
  const stripRef = useRef(null);
  const THUMB_MAX_WIDTH = 220;
  const PEEK_WIDTH = 34;
  useEffect(() => {
    const strip = stripRef.current;
    if (!strip) return;
    const measure = () => {
      const box = strip.querySelector("[data-carousel-imgbox]");
      if (box && box.clientHeight) setImgH(box.clientHeight);
    };
    measure();
    const ro = new ResizeObserver(measure);
    ro.observe(strip);
    return () => ro.disconnect();
  }, []);
  const fromChildren = React.Children.toArray(children).map(c => c && c.props && c.props.src ? {
    src: c.props.src,
    alt: c.props.alt
  } : null).filter(Boolean);
  const items = fromChildren.length ? fromChildren : images || [];
  if (!items.length) return null;
  const count = items.length;
  const columns = Math.min(perView, count);
  const totalPages = Math.ceil(count / columns);
  const showControls = totalPages > 1;
  const goTo = p => setPage((p % totalPages + totalPages) % totalPages);
  const prev = () => goTo(page - 1);
  const next = () => goTo(page + 1);
  const start = page * columns;
  const visible = items.slice(start, start + columns);
  const prevPeek = start > 0 ? items[start - 1] : null;
  const nextPeek = start + columns < count ? items[start + columns] : null;
  const renderPeek = (img, side) => {
    if (!img) return null;
    const isLeft = side === "left";
    return <button type="button" onClick={isLeft ? prev : next} aria-hidden="true" tabIndex={-1} style={{
      flex: `0 0 ${PEEK_WIDTH}px`,
      width: PEEK_WIDTH + "px",
      alignSelf: imgH ? "flex-start" : "stretch",
      height: imgH ? imgH + "px" : undefined,
      border: 0,
      padding: 0,
      cursor: "pointer",
      opacity: 0.5,
      borderRadius: isLeft ? "10px 0 0 10px" : "0 10px 10px 0",
      backgroundImage: `url("${img.src}")`,
      backgroundRepeat: "no-repeat",
      backgroundSize: "auto 100%",
      backgroundPosition: isLeft ? "right center" : "left center",
      WebkitMaskImage: `linear-gradient(to ${isLeft ? "left" : "right"}, #000 15%, transparent 100%)`,
      maskImage: `linear-gradient(to ${isLeft ? "left" : "right"}, #000 15%, transparent 100%)`
    }} />;
  };
  const arrowStyle = {
    flex: "0 0 auto",
    width: "30px",
    height: "30px",
    borderRadius: "50%",
    border: "1px solid var(--ad-border, #e4e5e7)",
    background: "var(--background, #fff)",
    fontSize: "16px",
    lineHeight: "28px",
    textAlign: "center",
    cursor: "pointer",
    padding: 0
  };
  return <div style={{
    outline: "none",
    margin: "1.5rem 0"
  }} role={showControls ? "group" : undefined} aria-label={showControls ? "Screenshot carousel" : undefined} aria-roledescription={showControls ? "carousel" : undefined}>
      <div style={{
    display: "flex",
    alignItems: "center",
    gap: "10px"
  }}>
        {showControls && <button type="button" onClick={prev} aria-label="Previous screenshots" style={arrowStyle}>
            ‹
          </button>}

        <div ref={stripRef} style={{
    display: "flex",
    flexWrap: "nowrap",
    alignItems: "flex-start",
    gap: "14px",
    justifyContent: "center",
    flex: 1
  }}>
          {renderPeek(prevPeek, "left")}
          {}
          {Array.from({
    length: columns
  }).map((_, i) => {
    const img = visible[i];
    const slotStyle = {
      margin: 0,
      flex: "1 1 0",
      maxWidth: THUMB_MAX_WIDTH + "px",
      minWidth: 0
    };
    if (!img) {
      return <div key={start + i} aria-hidden="true" style={{
        ...slotStyle,
        visibility: "hidden"
      }} />;
    }
    return <div key={start + i} style={slotStyle}>
                <span data-carousel-imgbox style={{
      display: "block"
    }}>
                  <img src={img.src} alt={img.alt ?? ""} style={{
      display: "block",
      width: "100%",
      height: "auto",
      margin: 0,
      borderRadius: "10px",
      border: "1px solid var(--ad-border, #e4e5e7)"
    }} />
                </span>
                {img.alt && <div style={{
      marginTop: "6px",
      fontSize: "12px",
      lineHeight: 1.4,
      color: "var(--ad-muted, #6b7280)",
      textAlign: "center"
    }}>
                    {img.alt}
                  </div>}
              </div>;
  })}
          {renderPeek(nextPeek, "right")}
        </div>

        {showControls && <button type="button" onClick={next} aria-label="Next screenshots" style={arrowStyle}>
            ›
          </button>}
      </div>

      {showControls && <div style={{
    textAlign: "center",
    marginTop: "8px",
    fontSize: "12px",
    color: "var(--ad-muted, #6b7280)"
  }}>
          {start + 1}
          {visible.length > 1 ? "–" + (start + visible.length) : ""} of {count}
        </div>}
    </div>;
};

Administrators with trusted destination management permissions can add trusted destinations to speed up the withdrawal process. Trusted destinations can be added as single addresses or in bulk from the web dashboard.

Trusted destinations are **per-network**. The same address on Ethereum and on Base are two separate trusted destinations, so add one for each network you'll withdraw to. A withdrawal can fail if the address is allowlisted on a different network than the one you're sending on.

To block withdrawals to one-time (non-allowlisted) addresses entirely, ask your sales or client experience support to enable the trusted-destinations-only control for your organization.

Adding a trusted destination follows your default administrator policy unless a custom trusted destination policy is configured—see [Managing administrator policy rules](/knowledge-base/platform/users/web-dashboard/team-policies#managing-administrator-policy-rules).

Smart-contract and program addresses can also be added as trusted destinations. Program-derived (off-curve) addresses may need additional handling, so contact your client experience team when adding one.

<Warning>
  Adding a trusted destination requires biometric approval in the iOS app and quorum approval. Only administrators with trusted destination management permissions can add or remove trusted destinations.
</Warning>

## Sending to your own org's addresses

You can add addresses that belong to your own organization as trusted destinations to tag and remember critical internal addresses. This is entirely optional — you don't need a trusted destination to send to your own vaults.

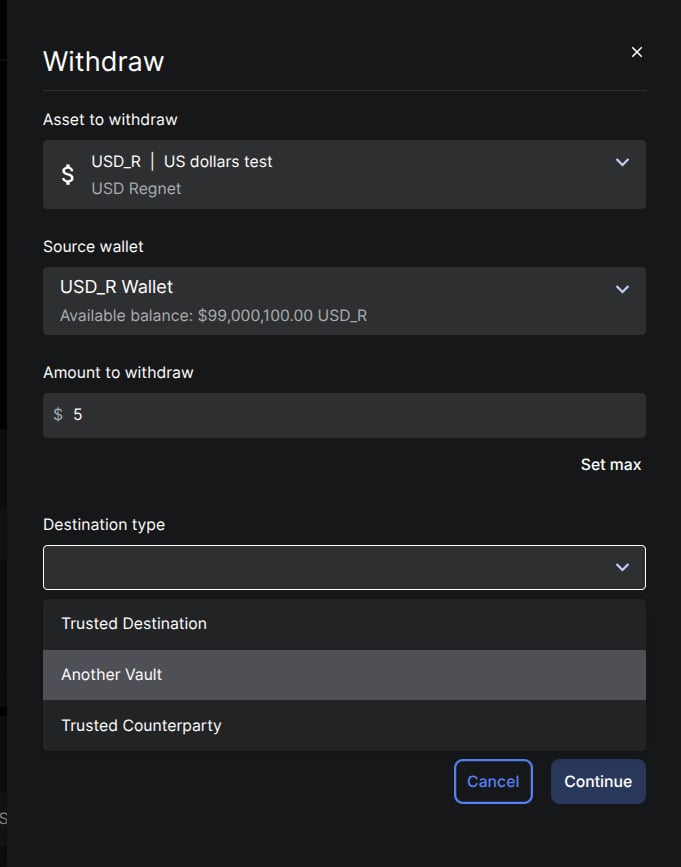
When withdrawing to an address your organization already controls, select the destination type that fits your workflow:

<Frame caption="Select Another Vault to send directly to one of your own vaults">
  <img src="https://mintcdn.com/deployment-4/egXqT0I7T-B9yf15/knowledge-base/images/screenshots/anchorage-withdraw-destination-another-vault.png?fit=max&auto=format&n=egXqT0I7T-B9yf15&q=85&s=02bf950f3553e2a4ae0368c70ffacffe" alt="Withdrawal dialog with Another Vault highlighted in the Destination type dropdown" width="681" height="867" data-path="knowledge-base/images/screenshots/anchorage-withdraw-destination-another-vault.png" />
</Frame>

* **Another Vault** — sends to one of your own vaults directly. No trusted destination setup or per-request quorum approval is needed, making this the simplest path for routine internal movement.
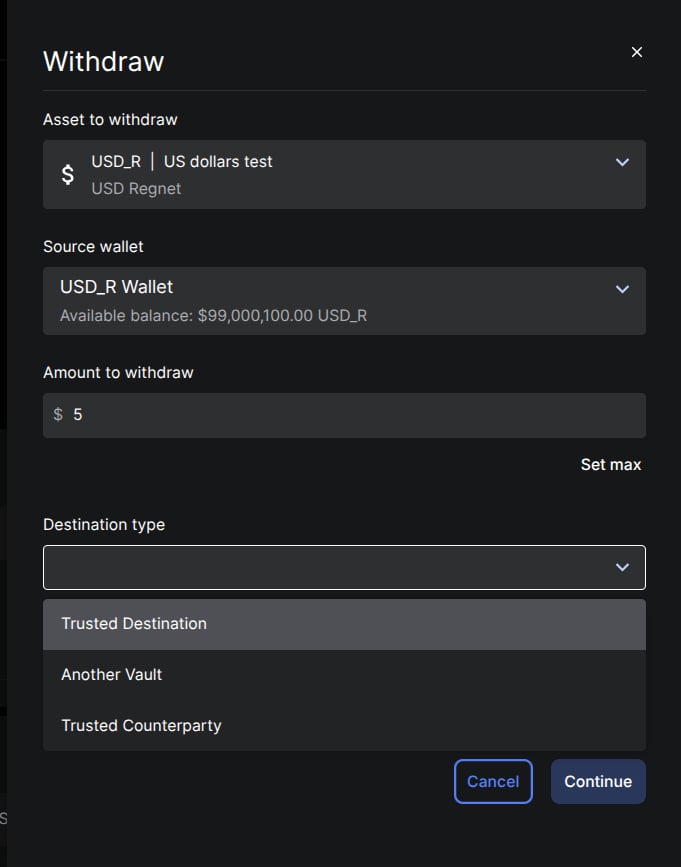
<Frame caption="Select Trusted Destination to send to a pre-approved address you've labeled">
  <img src="https://mintcdn.com/deployment-4/egXqT0I7T-B9yf15/knowledge-base/images/screenshots/anchorage-withdraw-destination-trusted-destination.png?fit=max&auto=format&n=egXqT0I7T-B9yf15&q=85&s=9ea7ecc340442b7c3881409c6eed9ddf" alt="Withdrawal dialog with Trusted Destination highlighted in the Destination type dropdown" width="681" height="867" data-path="knowledge-base/images/screenshots/anchorage-withdraw-destination-trusted-destination.png" />
</Frame>

* **Trusted Destination** — sends to a pre-approved, labeled address. Use this when you've added your own org's address as a trusted destination so your team can recognize it by name during future withdrawals.

If you're integrating via API and want to avoid per-transaction quorum for internal movements, use the [internal transfer API](/knowledge-base/platform/developers/move-money/transfer/crypto#internal-transfer) — it moves assets between your own wallets without allowlisting or quorum approval.

## Adding a single trusted destination

<Steps>
  <Step title="Open Trusted destinations">
    Navigate to **Settings**, then **Trusted destinations**, and click **Add**.
  </Step>

  <Step title="Select single address">
    Click **Add single address**.
  </Step>

  <Step title="Enter address details">
    Select the asset, enter the address, provide a name and description, then click **Continue**.
  </Step>

  <Step title="Fill out the form">
    Complete the address details form and click **Continue**. Optionally add a comment.
  </Step>

  <Step title="Confirm and approve">
    Review the operation details and click **Confirm and submit for approval**. Complete the endorsement process in the Anchorage Digital iOS app.
  </Step>
</Steps>

The AML field on a trusted destination isn't set during setup. It populates at withdrawal time from the latest prior transaction to that address and asset, so it can be empty on your first withdrawal and fills in automatically on subsequent ones.

## Adding multiple trusted destinations

<Steps>
  <Step title="Open Trusted destinations">
    Navigate to **Settings**, then **Trusted destinations**, and click **Add**.
  </Step>

  <Step title="Select bulk upload">
    Click **Upload multiple from file**.
  </Step>

  <Step title="Download and complete the template">
    Download the provided Excel spreadsheet template and fill it out in your preferred spreadsheet editor (Excel or Google Sheets). Save the completed file as a CSV.
  </Step>

  <Step title="Upload the CSV">
    Upload your completed CSV file to the web dashboard.
  </Step>

  <Step title="Review and submit">
    Review the list of trusted destinations, make any necessary adjustments, and click **Submit** for approval. Complete the endorsement process in the iOS app.
  </Step>
</Steps>

### Trusted destination template fields

| Field                    | Description                                                                                                                                                              |
| ------------------------ | ------------------------------------------------------------------------------------------------------------------------------------------------------------------------ |
| `destinationType`        | The type of custodial provider: `Financial Institution` or `Self-Hosted Wallet`.                                                                                         |
| `destinationDescription` | The name of the custodial provider (e.g., the name of a crypto exchange).                                                                                                |
| `destinationCountry`     | Two-letter country code for where the financial institution is incorporated. Required for `Financial Institution` type only.                                             |
| `recipientType`          | The ultimate beneficiary of assets: `My Organization`, `Other Entity`, or `Other Person`.                                                                                |
| `recipientName`          | Name of the beneficiary. Required for `Other Entity` or `Other Person` types only.                                                                                       |
| `recipientCountry`       | Two-letter country code for where the beneficiary entity is incorporated or the beneficiary person resides. Required for `Other Entity` or `Other Person` types only.    |
| `destinationOwner`       | Owner of a self-hosted wallet: `My organization` or `Other person or entity`. Required for ADS (Anchorage Digital Singapore) entities when type is `Self-Hosted Wallet`. |

<Note>
  Required fields are marked with a red asterisk in the template.
</Note>

After uploading, Anchorage Digital parses the file and allows you to review results and address any warnings or errors. If unresolvable errors are found, you will need to correct and re-upload the file.

## Removing trusted destinations

<Steps>
  <Step title="Navigate to Trusted destinations">
    Go to **Settings**, then **Trusted destinations**.
  </Step>

  <Step title="Select the destination">
    Click the three-dot menu next to the trusted destination you want to remove.
  </Step>

  <Step title="Confirm removal">
    Select **Remove**. Biometric approval in the iOS app is required. Once quorum is met, Anchorage Digital will review the operation.
  </Step>
</Steps>